Simple Workflow Tweaks for Scientific Python Projects

I’ve recently been chatting with a couple of mates who are doing scientific research using Python. Answering specific code questions is a lot of fun, as I try to figure out enough of their domain to see if/how I can help.
However, there are some general workflow improvements that I think both they and other scientific Python programmers could benefit from. In this post, I’ll share some lightweight workflow improvements that can help make your code better.
Research code is often different from production software: it doesn’t need to be as robust or strictly engineered. However, a few simple practices can make it far more reproducible and maintainable.
In this post, we’ll explore steps to improve reproducibility, collaboration, and confidence in your results — without overcomplicating your code.
This post assumes you’re using GitHub (or a similar platform like GitLab or Gitea) for version control. If you’re not yet using a VCS, I highly recommend starting there.
If you are working on more software-engineering-oriented projects, this post is probably not for you, as there are many more things you should be doing.
We’ll go through a few simple steps:
- Creating a Python package with a reproducible environment.
- Writing tests with
pytestto catch bugs early. - Using pre-commit hooks to maintain code quality automatically.
- Setting up GitHub Actions to run tests on every push.
The Project
Let’s say we’re using Astropy to do some cosmology calculations. This isn’t my area of expertise, I’ve just made some bullshit code that shows the development practices: apologies if it offends your sensibilities!
Initially, we explored these calculations in a Jupyter notebook. While notebooks are great for experimentation, they aren’t ideal for sharing, testing, or reusing code. I’ve seen people with functions they copy between every notebook, making slight changes each time, and then lose track of which version is “the good one”.
Our first goal is to take some commonly used functions from the notebook and turn them into a small, reusable Python package that we can import into any notebook or script.
Common Package
The outcome of this section can be seen on commit ed941a of this GitHub
repository.
I’ll walk through the steps below.
When you have functions that you want to reuse across multiple notebooks or scripts, it’s best to put them in a common package rather than copying and pasting. Copying code can quickly lead to inconsistencies and bugs as your code evolves.
For this project, we’ll create a small package called cosmole containing
three scripts:
.
├── cosmole
│   ├── __init__.py
│   ├── angular_separation.py
│   ├── convert_equatorial_to_galactic.py
│   └── redshift_to_distance.py
└── notebooks
    └── 2025-10-07-exploration.ipynb
The __init__.py file defines what is accessible when someone imports the package:
# cosmole/__init__.py
from .redshift_to_distance import redshift_to_distance
from .angular_separation import angular_separation
from .convert_equatorial_to_galactic import convert_equatorial_to_galactic
Now (once we’ve finished the following sections), from any notebook or script in the project, you can import your functions:
from cosmole import (
    redshift_to_distance,
    angular_separation,
    convert_equatorial_to_galactic,
)
Dependency Management
In scientific projects, it’s easy for code to stop working later if
software packages you depend on change.
When I was writing up my PhD, I had to regenerate some plots from my first year and ran into issues because matplotlib had changed; I wasn’t sure which version I had originally used — it was a pain.
To avoid “it worked on my machine” problems, we can specify exact package
versions using a requirements.txt file.
This is a simple text file listing all the Python packages your project depends on, along with their versions. For our project, you can see it here.
You can install these dependencies with:
pip install -r requirements.txt
Or with conda:
conda install --file requirements.txt
This ensures anyone cloning the repository can reproduce your environment and run your code without surprises.
Setting up the package
To make Python aware of your cosmole package, we need a setup.py file at
the root of the project. This file tells Python how to install your package and
its dependencies. In our example project, you can see it here.
We can now install our package with:
pip install -e .
- The
-eflag means editable — any changes you make to the source code are reflected immediately when you import the package. - This is especially handy when working interactively in notebooks.
Additionally, adding and executing these lines at the top of your notebooks will
also mean you automatically reload your package whenever you edit any of your
.py files:
# Enable autoreload so that changes in imported modules are reflected automatically
%load_ext autoreload
%autoreload 2
Note to Conda users
If you use Conda, you might need an additional file pyproject.toml in your
project to ensure
that the package installs correctly.
E.g.,
[build-system]
requires = ["setuptools", "wheel"]
build-backend = "setuptools.build_meta"
This is because modern versions of pip build packages in isolated
environments.
So you need to specify that setuptools and wheel are required to build the
package (which then installs the dependencies from requirements.txt).
Testing Your Code
The outcome of this section can be seen on commit 9905048.
Once you have refactored your functions into your package, it’s a good idea to write tests.
Actually, one approach is to write the tests first as we’re developing our initial implementation of our functions (a practice known as test-driven development). However, in research, this might not always be the most practical approach.
Tests help ensure that your code behaves as expected, which is especially useful when making changes or refactoring. Good test design is an art, thinking about edge cases and failure modes.
Even if your research code is exploratory, having a few basic automated tests can catch obvious bugs early and give you confidence that updates don’t break existing functionality.
During development, you might find that a test itself was wrong, or you changed the intended purpose of a function. In which case, just update the test — make them work for you!
We can use the pytest package to write and run tests. For example, let’s test
one of our functions by adding a file
tests/test_convert_equatorial_to_galactic.py to the project:
import pytest
from astropy.coordinates import SkyCoord
import astropy.units as u
from cosmole import convert_equatorial_to_galactic

def test_convert_equatorial_to_galactic():
    ra, dec = 83.82208, -5.39111  # Approx location of Orion Nebula
    l, b = convert_equatorial_to_galactic(ra, dec)
    coord = SkyCoord(ra=ra*u.deg, dec=dec*u.deg, frame='icrs').galactic
    assert pytest.approx(l, rel=1e-6) == coord.l.degree
    assert pytest.approx(b, rel=1e-6) == coord.b.degree
The assert pytest.approx lines verify that the function returns the expected results, raising an error if it doesn’t.
To run the tests, from your project root, run:
pytest
You should see output like this:
tests/test_angular_separation.py .                                                               [ 33%]
tests/test_convert_equatorial_to_galactic.py .                                                   [ 66%]
tests/test_redshift_to_distance.py .
[100%]
Which shows that all our tests passed. If we’d introduced a bug (e.g., I accidentally added 10 to one of my results), the test would catch this:
tests/test_convert_equatorial_to_galactic.py F                                                   [ 66%]
tests/test_redshift_to_distance.py .                                                             [100%]

=============================================== FAILURES ===============================================
_________________________________ test_convert_equatorial_to_galactic __________________________________

    def test_convert_equatorial_to_galactic():
        ra, dec = 83.82208, -5.39111  # Approx location of Orion Nebula
        l, b = convert_equatorial_to_galactic(ra, dec)
        coord = SkyCoord(ra=ra * u.deg, dec=dec * u.deg, frame="icrs").galactic
>       assert pytest.approx(l, rel=1e-6) == coord.l.degree
E       assert 219.01374318285238 ± 2.2e-04 == np.float64(209.01374318285238)
E
E         comparison failed
E         Obtained: 209.01374318285238
E         Expected: 219.01374318285238 ± 2.2e-04

tests/test_convert_equatorial_to_galactic.py:11: AssertionError
Pre-commit Hooks
To help maintain consistent code quality, we can use pre-commit hooks. These are scripts that automatically run before each commit to check for common issues like code formatting, linting, or missing documentation.
The key benefits of pre-commit hooks are:
- Catch issues early — errors or style violations are flagged before they enter your repository.
- Automatic fixes — many hooks, like code formatters, can fix problems automatically, saving time.
- Consistency across contributors — ensures everyone on the project follows the same style and quality rules.
Configuration
Pre-commit hooks are configured in a .pre-commit-config.yaml file at the root of your project.
For example, a simple configuration might include:
- Ruff — a fast Python linter and code formatter.
- Prettier — for formatting YAML, Markdown, and JSON.
In our example project, you can see the configuration file here.
You can install pre-commit and set it up with:
pip install pre-commit
pre-commit install
Now, every time you make a commit, the hooks defined in your configuration file will run automatically on any files that have changed. You can also run them manually on all files with:
pre-commit run --all-files
In our code, several automatic reformatting steps were applied: none of which should change our functionality, only the neatness of our
code. For example, removing unused imports, making sure lines don’t get too
long, being consistent with the use of whitespace, etc.
However, there are also some issues that need manual review. For example, Ruff complained that
we had an ambiguous variable name l (lowercase L - which looks like a 1).
tests/test_convert_equatorial_to_galactic.py:8:5: E741 Ambiguous variable name: `l`
   |
 6 | def test_convert_equatorial_to_galactic():
 7 |     ra, dec = 83.82208, -5.39111  # Approx location of Orion Nebula
 8 |     l, b = convert_equatorial_to_galactic(ra, dec)
   |     ^ E741
 9 |     coord = SkyCoord(ra=ra*u.deg, dec=dec*u.deg, frame='icrs').galactic
10 |     assert pytest.approx(l, rel=1e-6) == coord.l.degree
   |
Normally, I’d recommend following the rules — they’re opinionated but usually sensible.
However, we can tell Ruff to ignore this specific warning by adding a comment to the end of the line.
l, b = convert_equatorial_to_galactic(ra, dec) # noqa: E741
You can skip pre-commit using --no-verify, but only do so if you have a good
reason (like it’s 10pm and you just want to get your changes saved before bed 😴).
In my example, you can see all the pre-commit changes in
d23d21a.
In practice, these changes would be applied at the time of writing the code in
the first place, but I wanted to show the before-and-after.
GitHub Actions
Now, we have tests and pre-commit hooks, which are great for local development. However, we also want to make sure that our code is tested when we push changes, especially if we’re collaborating with others.
GitHub Actions allows you to run workflows on GitHub-hosted machines. While these have limited compute power, they can easily handle running basic tests and automation tasks.
For our example, we can create a workflow that runs our tests and pre-commit hooks on every push to the repository. If your code can run and pass on a different machine, that is a great indicator that it is reproducible and not dependent on your local setup.
Let’s do this by creating a file .github/workflows/ci.yml as shown here.
Now, every time you push changes or create a pull request, GitHub Actions will automatically run your tests and hooks. This adds an extra layer of confidence and helps maintain a reliable, reproducible scientific codebase.
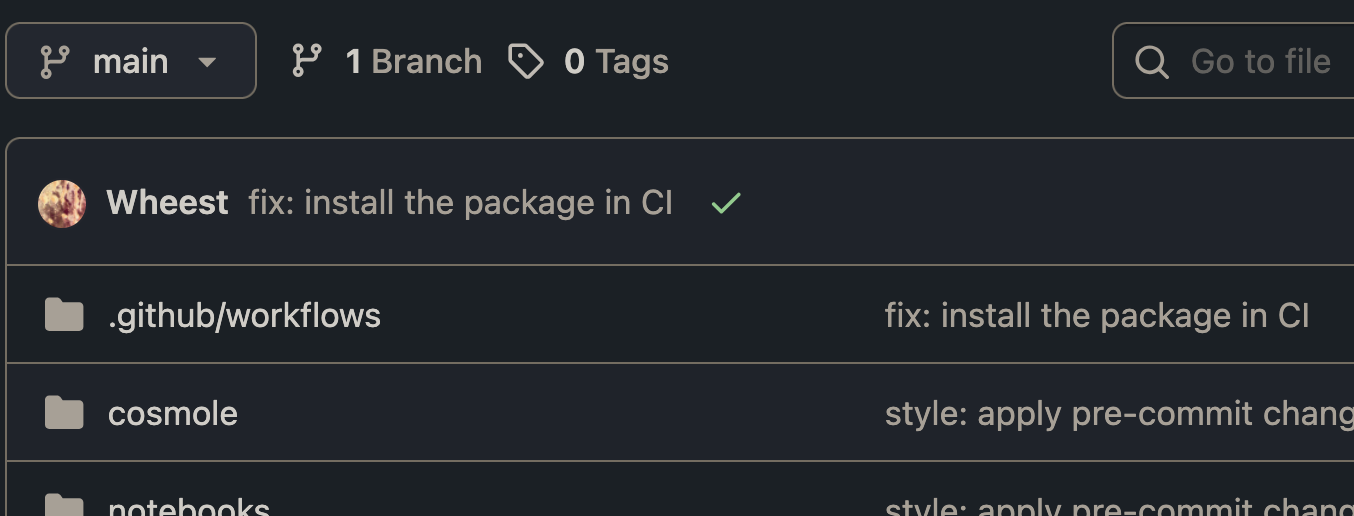
You can see on the repo’s GitHub page, a yellow circle after we’ve pushed, meaning the checks are running
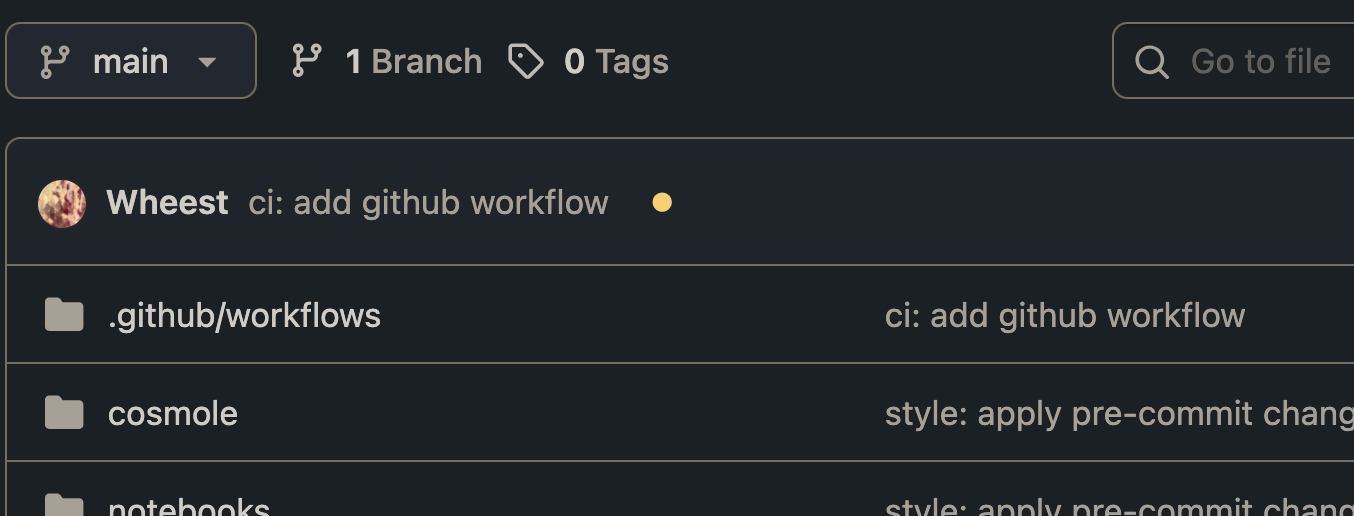
You can see initially, this run fails, and we can click on the red ❌ to see the terminal logging what went wrong.
In this case, we didn’t actually install our package on the GitHub runner.
Therefore, we need to add pip install . to the workflow:
- name: Install the package
  run: pip install .
Now, our code passes!
In future, we’ll be able to see which commits introduced bugs in our code.
If you use a git feature branch workflow (using branches for features and
PRs), then you can enforce that any commits to main must pass these checks.
However, this may be overkill for a small research project.
Conclusion
Ultimately, the goal of research code is to help us explore and answer our research questions. However, small software engineering standards can pay dividends if applied in a sensible way.
There are more things you may want to explore, for example, you can add more rules to Ruff (like enforcing documentation). Similar workflows can also be applied to projects in other programming languages. You may also want to standardise your git commit message format, e.g., using Conventional Commits.
P.S. props to my black-hole buddy Melize for providing the header image, which is his reproduction of Korol et al. 2018.